
Learn how to create an exceptional wood texture finish using Photoshop. Transform your background like wood finishing.
Step 1: Create a Brown background for your canvas
Open a new file by clicking on File>Open. Click on  Set foreground color. Choose brown color or a shade of wood color with Eye dropper Tool. Click on OK. Select
 ![]() Paint Bucket Tool. Click on your canvas. It will fill the background with brown color.
Paint Bucket Tool. Click on your canvas. It will fill the background with brown color.
 Step 2 : Add Noise
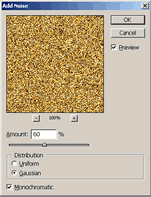
 Go to Filter>Noise>Add noise. A screen named Add Noise will appear. Select amount as 60% and distribution as gaussian. Check on Monochromatic. Click on Ok.
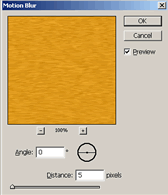
Go to Filter>Blur>Motion Blur. A screen named Motion Blur will appear. Select angle as 0 and distance as 5. Click on Ok.

Step 4 : Use the liquify filter Open Go to Filter>Liquify. A window named Liquify will appear. |
Great! You have successfully created your wood texture effect.
 Tags :- Photoshop 8 , Photoshop 7 trick , trick for Photoshop CS6 , photoshop PNG , Png Images , image png , png , transparent images , transparent png , psd , psd image , png free , download png , png for free , png blogspot , png photoshop , photoshop png images , images for photoshop , cs5 trick , photoshop tricks , photoshop tricks , photoshop background , photoshop psd , photoshop cs5, photoshop cs5 trick,


No comments:
Post a Comment